Table of Contents
ToggleHow to Create Beautiful Cookies with Pressed Herb Designs
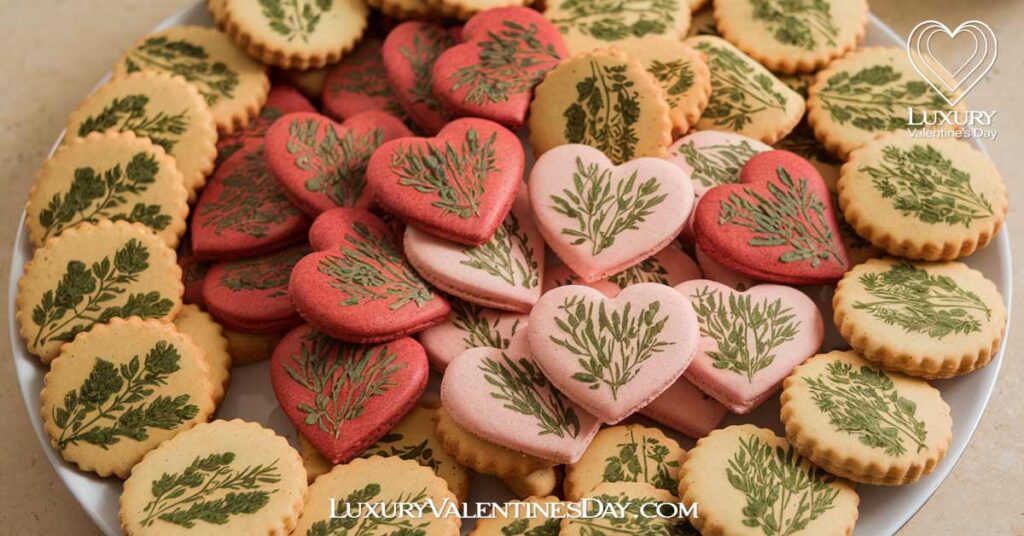
For a unique, nature-inspired twist, pressed herb cookie decoration brings beauty and freshness to your cookies, perfect for special gatherings and seasonal events.
Using fresh, edible herbs like rosemary, thyme, and lavender, you can turn cookies into charming, rustic treats that look as good as they taste. The pressed herb decoration technique infuses a simple elegance, making each cookie a delightful blend of flavour and artistry.
Imagine serving cookies adorned with vibrant green herbs, pressed delicately into the dough to capture their natural beauty. With pressed herb cookie decoration, you’ll create one-of-a-kind treats that are as refreshing to look at as they are to enjoy.
Pressing herbs into cookie dough may sound simple, but the results are stunning. This guide will show you how to select the right herbs, press them correctly, and bake cookies with a touch of nature’s elegance. Whether you’re planning for a wedding, brunch, or holiday gathering, pressed herb cookies are a standout choice.
For more round cookie decorating ideas and unique styles, check out our Valentine’s Day cookie decorating guide.
How to Add Pressed Herbs To Your Cookies
Using fresh, edible herbs to decorate cookies is a straightforward process, but attention to detail is key to achieving a clean, rustic look. Here’s how to press herbs into cookies for that effortless, natural finish:
1. Choose Edible Herbs
Not all herbs are suitable for baking, so it’s important to choose fresh, edible herbs that pair well with sweet flavours. Popular choices include:
Thyme: Small, delicate leaves that add a subtle earthiness.
Rosemary: Slim, pine-like needles that give a woodsy, aromatic scent.
Mint: Heart-shaped leaves that add a cool, refreshing fragrance.
Lavender: Tiny, violet buds with a soft floral aroma, ideal for creating romantic, rustic designs.
Sage: Large, fuzzy leaves that are visually appealing and add a touch of greenery.
Tip: Use herbs that are fresh and organic, as they’ll retain their colour better and won’t introduce unwanted chemicals.
2. Prepare the Cookie Dough
Roll out your cookie dough to the desired thickness and cut it into shapes. Chilling the dough for 10-15 minutes before pressing the herbs can help keep the cookie’s shape and ensure the herbs adhere well.
Tip: Choose simple, sturdy shapes like circles or squares to better showcase the herb designs without losing detail at the edges.
3. Press the Herbs Before Baking
Place the herbs on each cookie and press them lightly into the dough. Use a small rolling pin, the back of a spoon, or your fingers to press evenly, embedding the herbs slightly so they stay in place during baking. Be careful not to press too hard, as you want the herbs to sit naturally on the surface rather than being fully embedded.
Tip: Arrange the herbs in visually pleasing patterns. For example, place a sprig of rosemary diagonally across a rectangular cookie or arrange thyme leaves in a circle around the edge of a round cookie.
4. Bake Carefully
Bake the cookies as directed, keeping an eye on them to avoid over-browning, as herbs can become brittle if exposed to too much heat. The herbs will dry slightly during baking, creating a rustic, preserved look.
Tip: For a more vibrant appearance, bake the cookies at a lower temperature for a slightly longer time to prevent the herbs from browning too much.
5. Adhering Herbs After Baking
If you prefer the herbs to remain fresh-looking and vibrant, apply them after baking using a light layer of sugar glaze, honey, or edible glue to adhere them. Simply brush a thin layer of glaze on the cookie and gently press the herbs into place.
Tip: This method is perfect for cookies intended for immediate consumption, as the fresh herbs will look and smell more vibrant than if baked.
Essential Herbs and Tips for Pressed Herb Cookie Decoration

Adding pressed herbs to your cookies can elevate them with natural beauty and subtle herbal flavours. This table covers the best herbs to use, how they enhance your cookies, and tips for creating pressed herb designs that stay vibrant through baking.
| Herb | Best For | Flavour Profile | Tips for Use |
|---|---|---|---|
| Rosemary | Adding visual texture and aroma | Pine-like, slightly bitter | Press lightly; pair with citrus or chocolate |
| Thyme | Subtle flavour with delicate leaves | Earthy, slightly floral | Use sparingly for soft, subtle accents |
| Lavender | Elegant, floral look and aroma | Sweet, floral | Place sparingly for visual appeal; not overpowering |
| Mint Leaves | Bold green colour and fresh aroma | Fresh, cool | Press firmly; pairs well with chocolate |
| Edible Flowers (e.g., pansies) | Adding bright colours and variety | Mild, depending on flower | Gently press into dough; add post-baking as needed |
Presentation Tips for Pressed Herb Cookies
Pressed herbs create a beautiful, natural look, but pairing them with the right finishing touches can make them even more charming and visually appealing. Here are some ideas for taking your rustic herb cookies to the next level:
1. Pair with a Drizzle of Honey
After pressing the herbs, drizzle a small amount of honey over the baked cookies. The honey adds a beautiful sheen and a hint of sweetness that complements the earthy flavours of the herbs. For an extra touch, sprinkle a pinch of coarse sea salt on top to balance the sweetness and enhance the herbal aroma.
Perfect for: Cookies with thyme, rosemary, or lavender, as these herbs pair particularly well with the subtle sweetness of honey.
2. Sprinkle with Coarse Sugar for Texture
Add a sprinkle of coarse sugar before baking for a subtle sparkle and a delicate crunch that contrasts nicely with the herbs. The sugar crystals catch the light and give the cookies a warm, rustic look that feels both refined and homemade.
Perfect for: Cookies with small-leaved herbs like thyme or mint, as the sugar helps highlight their delicate appearance.
3. Use Edible Flowers for Extra Colour
For a more elaborate design, combine herbs with edible flowers such as violets, pansies, or calendula petals. The colourful blooms create a beautiful contrast against the green herbs, adding a touch of romance and sophistication to your rustic cookies.
Perfect for: Garden-themed parties, springtime events, or romantic celebrations. The combination of herbs and flowers brings a natural, artisanal quality that’s visually captivating.
4. Serve with a Herbal Tea Pairing
Enhance the rustic charm by pairing your herb-decorated cookies with a complementary herbal tea, such as mint, chamomile, or lavender tea. This thoughtful pairing creates a cohesive and aromatic experience, making the cookies feel even more special.
Perfect for: Afternoon teas, bridal showers, or any event where you want to provide a relaxed, rustic atmosphere.
5. Highlight with Edible Gold Dust for a Luxe Touch
For a more refined look, lightly brush edible gold dust over the edges of the cookie or around the herb designs. The gold adds a subtle, luxurious touch that complements the rustic appeal, making the cookies perfect for elegant gatherings or high-end events.
Perfect for: Weddings, holiday gatherings, or any event where you want to elevate the rustic style with a hint of glamour.
6. Incorporate Spices for Added Warmth
Sprinkle a hint of ground cinnamon, nutmeg, or cardamom over the cookies before baking to enhance the warm, earthy tones of the herbs. These spices add a layer of aromatic depth that pairs wonderfully with rosemary, thyme, or sage.
Perfect for: Fall and winter events, as the spices bring out a comforting, seasonal feel that’s perfect for cosy gatherings.
7. Display on Wooden Boards or Slate Trays
For a truly rustic presentation, arrange the cookies on a wooden board, slate tray, or a piece of parchment paper. The natural backdrop complements the earthy look of the pressed herbs and enhances the organic feel of the display.
Perfect for: Farm-to-table events, casual gatherings, or outdoor celebrations where you want to create a natural, relaxed aesthetic.
Additional Tips for Working with Pressed Herbs
1. Experiment with Herb Combinations
Mixing different herbs on one cookie can create a visually dynamic look. Try combining small leaves of thyme with a sprig of rosemary or pressing multiple types of mint leaves for a more intricate design.
Tip: Stick to herbs that are similar in size and texture to ensure they blend well visually and adhere evenly.
2. Keep Herbs Fresh Before Use
To keep herbs fresh and vibrant, store them in the fridge with damp paper towels until you’re ready to use them. Herbs can wilt quickly at room temperature, so prepare them just before decorating.
Tip: Use a soft brush or a small kitchen towel to gently pat the herbs dry before pressing them into the dough, as excess moisture can prevent them from sticking properly.
3. Press Lightly to Avoid Flattening the Cookie
While it’s important to embed the herbs slightly, pressing too hard can flatten the cookie dough and ruin the shape. Apply light, even pressure to ensure the herbs adhere without affecting the overall look of the cookie.
Tip: If you’re unsure, test on a spare piece of dough to get a feel for the right amount of pressure.
4. Enhance with a Hint of Citrus Zest
For an extra layer of fragrance, sprinkle a bit of lemon or orange zest over the herbs before pressing them onto the cookie. The citrus zest adds a refreshing aroma and complements the herbal notes, creating a unique and delightful flavour combination.
Tip: Pair citrus zest with mint or thyme for a fresh, bright flavour, or rosemary for a more complex, earthy taste.
5. Bake Low and Slow for a Fresh Look
To keep the herbs as vibrant as possible, bake the cookies at a slightly lower temperature and for a longer duration. This prevents the herbs from browning too quickly, helping them retain their natural colour.
Tip: Check the cookies a few minutes before the end of the baking time to ensure the herbs aren’t overbaked.
By incorporating pressed herbs into your cookie decorations, you can create visually striking and aromatic treats that bring a touch of nature into your baking. This technique not only adds a rustic, artisan feel to your cookies but also enhances them with fresh, herbal aromas that are sure to delight guests and elevate any occasion.
Frequently Asked Questions About Pressed Herb Cookie Decoration
Can I use any herb for pressed herb cookie decoration?
No, it’s best to use edible herbs like rosemary, thyme, lavender, and mint. Avoid non-edible or bitter herbs, as they could affect taste and safety.
Should I press herbs into the dough before or after baking?
It’s best to press the herbs into the dough before baking so they set into the cookie. If using delicate edible flowers, you can press them lightly after baking.
How do I keep herbs from browning in the oven?
Bake cookies at a low temperature and keep an eye on them. Alternatively, add the herbs partway through baking or press flowers after baking for a fresher look.
Can pressed herb cookies be stored for a few days?
Yes, store them in an airtight container at room temperature for up to three days. The herbs may lose some vibrancy but will retain flavour.
What type of cookie dough works best with pressed herbs?
Shortbread and sugar cookie doughs work well for pressed herb decorations, as they are firm enough to hold the herbs in place and have mild flavours that pair with herbs.
Previous Article
Ombre Decorated Cookies: Tips for Stunning Gradient Designs
Next Article
Two Tone Dipped Cookies: Unique Techniques for Beautiful Designs
Related Posts
- Delicious Creamy Tuscan Garlic Chicken Recipe
- Cookies Decorated with Sugar Sprinkles and Pearls: Simple Tips for Beautiful Results
- Date Ideas That Start with A: Amazing Adventures Await
- Ombre Decorated Cookies: Tips for Stunning Gradient Designs
- First Date Tips: Master the Art of Memorable Encounters
- 101 Eco-Friendly Date Ideas for a Sustainable Valentine’s Day


