Table of Contents
ToggleCreative Ways to Decorate Cookies for Any Occasion
Cookie decorating ideas are your secret to turning simple biscuits into elegant, edible art.
With a few creative touches, you can take classic cookie from ordinary to extraordinary, making each cookie a delicious statement piece.
It doesn’t matter if you’re a beginner or a seasoned baker—these ideas will inspire you to create beautiful cookies that’s perfect for any special occasion.
Decorating cookies is more than just a fun activity; it’s an opportunity to showcase your creativity and elevate your baking. Whether you’re preparing treats for Valentine’s Day, a family gathering, or just adding a touch of luxury to your weekend baking, a well-decorated cookie can make all the difference. These classic, buttery biscuits are a blank canvas ready to be transformed into something special.
From delicate dustings of powdered sugar to intricate royal icing designs, there are endless ways to personalise your shortbread. You don’t have to be a professional to create stunning results—many of these techniques are simple enough for beginners but stylish enough to impress any guest. This guide will cover a variety of cookie decorating ideas that combine elegance with ease, making it effortless to add a touch of flair to your bakes.
In the following sections, I’ll dive into decorating techniques that range from traditional to trendy, giving you plenty of inspiration to make your biscuit or coookie stand out. Whether you’re aiming for a classic look with a sprinkle of sugar or want to try your hand at creating a shortbread gingerbread house, there’s a technique here for everyone. Plus, I’ll share tips for getting the most out of your icing, chocolate, and decorative elements—so you can make your cookie as beautiful as it is delicious.
Prepare to elevate your decorating game with a mix of classic and contemporary decorating ideas. Each section will provide step-by-step guidance, so you can confidently transform your cookies into luxury treats that are perfect for any occasion.
How to Decorate Cookies Like a Pro
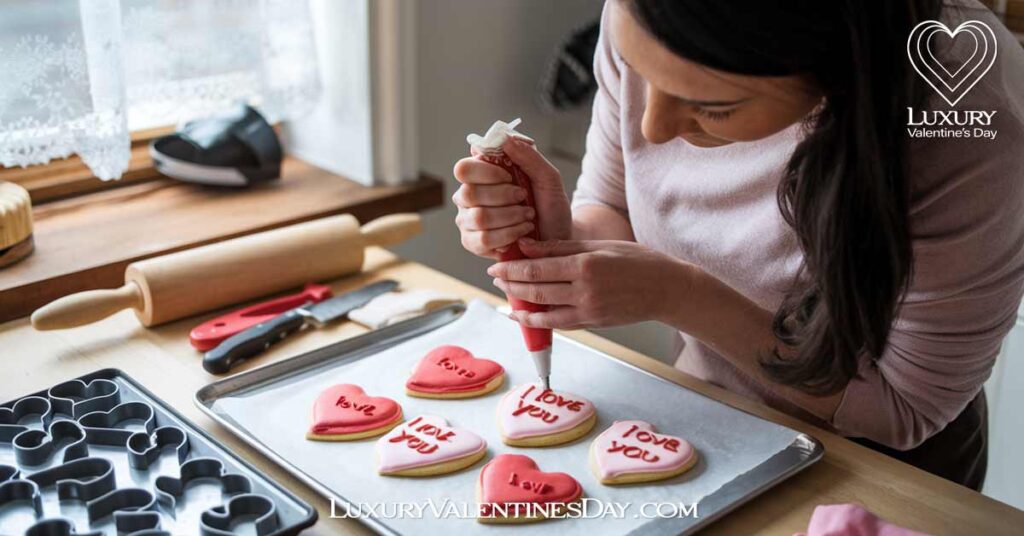
Decorating cookies is all about preparation and having the right tools at hand. It’s not just about making them look good—careful planning can make the decorating process smoother and more enjoyable. Whether you’re aiming for a professional finish or a rustic charm, having the basics in place sets the stage for stunning cookies every time.
Start with Good Quality Ingredients: If you want your decorations to stand out, start with the best cookie base you can. A well-baked cookie holds its shape and provides a sturdy foundation for whatever embellishments you want to add. Make sure it has completely cooled before decorating, as warm cookies can cause icing and other decorations to melt or slide off.
Tools You’ll Need:
- Piping Bags and Tips: Essential for any icing work. Use different tips for various effects—fine tips for detailing, round tips for smooth lines, and star tips for textured designs.
- Spatulas: A small offset spatula is perfect for spreading icing evenly or adding a glaze.
- Squeeze Bottles: Useful for controlled application of thinner icings or glazes.
- Food Colouring: High-quality gel colours work best for vibrant shades without affecting icing consistency.
- Edible Decorations: Items like sprinkles, edible glitter, and pearl dust can elevate simple designs to something truly special.
- Fine Brushes: Perfect for adding delicate details or brushing on edible gold leaf.
Preparation is key to achieving professional-looking cookies. Start by organising your workspace with all tools and ingredients laid out. Having everything within reach ensures you can work efficiently and with precision.
Thicker Icing for Borders and Lines
Thicker icing is the backbone of beautifully decorated cookies. It’s what allows you to create precise lines, elegant borders, and intricate patterns without any bleeding or running. Using a thicker icing gives you control over your designs, making it easier to keep them clean and well-defined.
Why Use Thicker Icing?
Thicker icing is ideal for outlining because it holds its shape well. If you’re creating an intricate design or want sharp edges, thicker icing will give you the precision you need. It’s perfect for making detailed borders, writing, and creating a frame that prevents thinner, flood icing from spilling over the edges.
How to Adjust Icing Consistency for Thicker Lines
To achieve the right thickness for borders and lines, start with a standard royal icing recipe. Gradually add more powdered sugar until the icing is thick enough to hold a peak. You want the consistency to be firm but still smooth enough to pipe without breaking. A simple way to test is by running a spoon through the icing—if the line stays without disappearing, you’ve got the right thickness.
Tips for Precision:
- Use a small round piping tip (size 1-3) for precise lines and borders.
- Hold the piping bag at a 45-degree angle, applying even pressure for a consistent line.
- Practise on a piece of parchment paper before moving to your cookies to get the feel of the icing and the pressure needed.
- If your lines start to break or become uneven, the icing may be too thick—add a few drops of water to adjust.
Thinner Icing for Filling In
Flooding, or filling in large areas with icing, requires a thinner consistency that spreads easily without being too runny. This technique creates a smooth, glossy surface that acts as a blank canvas for additional decorations or delicate details.
Why Use Thinner Icing?
Thinner icing is perfect for flooding areas because it spreads out smoothly, filling the space evenly. It creates a polished, professional look, giving your shortbread a beautiful sheen when dry. This is the go-to technique for creating solid colour bases or larger, uniform sections on the cookie.
How to Thin Icing Without Losing Consistency
Start with a thicker royal icing and gradually add small amounts of water—just a few drops at a time. Stir well after each addition until the icing runs off the spoon in a smooth, steady stream. The ideal consistency is when you can drag a spoon through the icing and the line disappears in about 10-15 seconds.
Methods for Smoothing Out Icing:
- Use a squeeze bottle for better control when flooding. This allows you to direct the icing precisely where you want it to go.
- Once you’ve flooded the area, use a toothpick or a small skewer to guide the icing into tight corners or to pop any air bubbles.
- Gently shake or tap the cookie to help the icing settle smoothly and eliminate any ridges or lines.
- Allow each layer of icing to dry completely before adding additional decorations to avoid smudging or mixing colours.
Decorating with both thicker and thinner icings opens up a world of creative possibilities. Once you’ve mastered the basics, you’ll have the confidence to explore more elaborate designs like marbling, layered patterns, and textural details. With these techniques, your shortbread will not only taste delightful but look absolutely stunning too!
20 Decorating Ideas and Techniques for Cookies
When it comes to decorating cookies, sometimes the most elegant results come from simple techniques. These classic methods don’t require extensive skills or tools, yet they still give your cookie a beautiful and sophisticated finish. Whether you’re short on time or want a classic look, these simple decorations will make your cookies stand out.
1. Dust Your Cookies with Powdered (Icing) Sugar

There’s a timeless elegance in simplicity, and a light dusting of powdered sugar (also known as icing sugar) can transform plain cookies into delicate, snowy delights. It’s one of the easiest ways to add a touch of luxury without overpowering its flavour. Icing sugar not only looks elegant, but it also highlights the natural texture of the cookie, giving it a refined finish that feels special.
2. Cookies Drizzled with Chocolate

Drizzling cookies with chocolate is a simple yet indulgent way to elevate their flavour and presentation. The glossy chocolate adds a luxurious touch to them, making it perfect for both everyday treats and special occasions. It’s a versatile decorating method that allows you to get creative without needing extensive skills or equipment. Whether you go for a classic chocolate drizzle or add a hint of shimmer, this technique turns your cookies into elegant and eye-catching delights.
3. Cookies Decorated with Royal Icing for a Professional Finish

Royal icing is a popular choice for decorating shortbread cookies because it dries hard, giving your cookies a sleek and polished appearance. It’s the go-to choice for creating smooth surfaces, precise lines, and elaborate details. Unlike other icings, royal icing can be made in various consistencies, allowing for a range of techniques, from outlining to flooding.
4. Cookies Dipped in Chocolate for a Decadent Touch

Dipping cookies in chocolate is one of the easiest ways to make them look and taste indulgent. The rich, glossy coating not only adds a layer of sweetness but also gives your cookies a professional finish with minimal effort. This technique is perfect for those who want to create luxurious, decorated cookies without spending hours in the kitchen. Whether you choose dark, milk, or white chocolate, dipping your shortbread adds a delicious, eye-catching element that is sure to impress.
5. Decorating Cookies with Edible Flowers for a Natural Look

Using edible flowers is a wonderful way to create cookies that are both visually stunning and delicate. They add a splash of colour and a fresh, romantic feel that’s ideal for special occasions. With the right choice of flowers, you can transform a simple biscuit into a work of art that captures the beauty of nature.
6. Fondant Icing Decorating Ideas

Fondant is a versatile and sophisticated medium that allows for endless creativity. It’s perfect for creating intricate designs, personalised messages, or themed decorations. Fondant’s smooth texture and ability to hold details make it a favourite choice for those who want to elevate their cookies with customised designs.
For more fondant decorating ideas, check out our article here.
Sugars, Glazes, and Patterns For Cookies
Adding a sprinkle of colourful sugars, edible pearls, and glazes is a classic yet sophisticated way to enhance the visual appeal of cookies. These decorating methods require minimal effort but create a stunning effect that makes your biscuits look polished and festive. Whether you’re after a subtle shimmer or a bright pop of colour, using these techniques can transform a simple biscuit into an elegant treat suitable for any occasion.
7. Cookies Decorated with Sugar Sprinkle or Pearls To Add Colour

Using colourful sugars and edible pearls can make your cookies shine, adding a touch of sparkle or a burst of colour to your baked goods. These decorations are perfect for creating visual interest without overwhelming the delicate flavour of shortbread. Whether you sprinkle before baking or after the cookies have cooled, sugars and pearls offer endless ways to elevate your presentation.
8. Decorating Cookies with Glaze Icing for a Shiny Finish

A simple glaze is a versatile way to add a beautiful, glossy finish to your cookies. It enhances the visual appeal without overpowering the taste, giving your biscuits a polished and sophisticated look. Whether you’re looking to create a sleek canvas for additional decorations or simply want to add a hint of sweetness, a well-made glaze can transform your baked goods from basic to brilliant. It’s an easy technique that doesn’t require advanced skills, making it perfect for bakers of all levels.
9. Decorating Cookie Ideas with Nuts, Fruits, or Spices To Add Texture and Flavour

Adding nuts, fruits, and spices to your cookies is a wonderful way to introduce new textures, flavours, and colours. These natural ingredients can transform a simple biscuit into a gourmet treat, making it more visually appealing and tastefully complex. Whether you want a subtle crunch, a burst of sweetness, or a warm hint of spice, using the right combination of toppings can make your decorated cookies perfect for any season or special occasion. Here’s how to incorporate these elements effectively.
10. Cookies Decorated with Marbled Icing: Create Stunning Effects

Marbled icing is a striking and elegant way to decorate cookies, adding a swirl of vibrant colours that resemble beautiful marble stone patterns. It’s a simple yet impressive technique that looks sophisticated and polished, perfect for elevating your cookie presentation. Marbled icing works well for a range of occasions, from chic weddings and birthday parties to festive holidays and romantic gatherings. The swirling colours create a sense of movement, and no two cookies will look exactly the same, making each biscuit a unique work of edible art.
11. Cookies Deocorated with Hand-Painted Designs for a Personal Touch

Hand-painted designs are a charming and creative way to personalise cookies, turning them into little works of edible art. Using edible paints or food colouring pens, you can add intricate details, romantic messages, or delicate patterns that elevate your cookies to the next level. This decorating method allows you to put your own artistic flair into each biscuit, making them perfect for weddings, anniversaries, holidays, or any special occasion where you want to make an impression. Hand-painted cookies have a refined, almost vintage quality that makes them feel both unique and luxurious.
12. Lace Sugar Decorated Cookies: Accents for a Vintage Look

Adding sugar lace accents to your cookies is a stunning way to achieve a sophisticated, vintage look that exudes elegance. Edible lace is delicate, intricate, and brings a unique charm to your decorated biscuits, making them perfect for weddings, tea parties, bridal showers, or any occasion that calls for a touch of class. The lace-like designs give the cookies a Victorian feel and add a sense of luxury, making them visually appealing and memorable. Using a sugar lace mix, you can easily create these detailed decorations and elevate your cookies from simple to spectacular.
13. Gold & Gilded Decorated Cookies for a Touch of Luxury

Adding gilded edges to your cookies instantly elevates their appearance, giving them a luxurious, high-end finish that looks like something you’d find in an upscale bakery or patisserie. This elegant technique involves using edible gold leaf or metallic edible paint to highlight the edges of your cookies, creating a striking contrast that draws attention to each delicate detail. Whether you’re decorating biscuits for weddings, anniversaries, holidays, or any sophisticated event, gilded edges provide a refined, opulent touch that exudes class and style.
14. Brushed Pearl Effect Decorated Cookies for an Elegant Glow

The brushed pearl effect is a sophisticated technique that adds a subtle yet captivating shimmer to your cookies, giving them an ethereal and luxurious glow. This method is perfect for when you want a refined, high-end look without the decorations overpowering the natural beauty of the biscuit. The gentle application of edible pearl dust in shades like gold, silver, or iridescent creates a soft, lustrous finish that catches the light beautifully, making the cookies appear almost luminous. The effect works especially well on cookies decorated with light or pastel colours, giving them a romantic and elegant touch.
15. Embossed Decorated Cookies for a Textured Look

Embossing is a fantastic way to add texture and intricate detail to your cookies, creating a visually stunning and tactile experience. This technique involves pressing patterns or designs onto the dough, fondant, or icing to create raised or indented textures that can range from delicate floral designs to bold geometric shapes. Embossed cookies have a timeless, elegant appeal that works beautifully for weddings, themed parties, or any occasion where you want to impress with sophisticated decorations. The embossed patterns catch the light and add depth to the surface, giving your cookies a professional, high-end finish.
16. Ombre Decorated Cookies for a Trendy Gradient

Ombre icing is a stylish and modern way to decorate cookies, creating a soft, gradual transition between shades for a stunning visual effect. This trendy gradient technique adds depth and sophistication, making your cookies look chic and contemporary. The ombre effect can be subtle or bold, depending on the colours you choose and the degree of blending, making it a versatile decoration for any occasion. It’s particularly well-suited to romantic or festive themes, like Valentine’s Day, weddings, or spring celebrations. Whether you go for delicate pastels or deep, dramatic hues, ombre icing is sure to make your cookies stand out.
17. Pressed Herb Decorated Cookies for a Rustic Touch

Incorporating fresh herbs into cookie decoration brings a charming, rustic appeal that feels both natural and artisanal. Pressed herbs add a touch of green elegance, giving your cookies a unique look and subtle aroma. This technique is ideal for anyone looking to create cookies that are visually interesting yet simple, with an earthy aesthetic that’s perfect for garden parties, countryside weddings, or holiday gatherings. By pressing fresh, edible herbs onto the dough or adding them post-baking with a thin glaze, you can create a beautiful and organic design that elevates your cookies with minimal effort.
18. Two-Tone Dipped Cookies for a Modern Look

Two-tone dipped cookies are a sleek, stylish way to make your treats visually striking and on-trend. By dipping each half of the cookie in contrasting colours, you can create a bold, graphic effect that feels both modern and playful. This technique allows you to experiment with different colour combinations, textures, and even flavours, making it ideal for parties, holiday gatherings, or any event where you want to impress with contemporary flair. Adding accents like metallic edible paint or edible glitter along the dividing line enhances the sophistication of the design, giving your cookies an elevated, luxurious finish.
19. Edible Lace Wrapped Cookies for a Vintage Finish

Edible lace wraps bring a touch of vintage elegance to cookies, transforming simple treats into delicate, refined confections reminiscent of intricate lacework found on bridal veils and Victorian textiles. This decorating technique adds a beautiful texture and visual appeal that’s perfect for weddings, tea parties, and romantic gatherings, offering a sophisticated, old-world charm. Edible lace wraps can be pre-made or crafted from a sugar lace mix, and they’re easy to work with, allowing you to create a look that’s both elegant and timeless. The lace’s delicate detailing catches the light, adding dimension to the cookies and making them look like they belong in an upscale patisserie.
20. Edible Glitter Sprays for a Sparkling Finish

Edible glitter sprays add a beautiful, eye-catching sparkle to cookies, instantly elevating their appeal with a touch of magic. Whether you’re aiming for a chic, understated shimmer or a bold, glistening finish, edible glitter sprays are the perfect tool to achieve a radiant, luxurious look. They work beautifully with any colour theme, from warm gold for elegant events to cool silver for winter gatherings, and are incredibly versatile—adding a delicate glow to minimalistic cookies or amplifying the glamour of intricate designs. Glitter sprays are easy to apply, and a little goes a long way, making them an excellent choice for adding just the right amount of sparkle.
Gift Wrapping Ideas for Cookies

The final touches and presentation of your beautifully decorated cookies can make a significant impact, especially if they’re meant as gifts. Wrapping decorated cookies thoughtfully showcases the time and care put into each one and enhances the gifting experience. From elegant ribbon to luxurious boxes and personalised tags, there are many creative ways to package your cookies that make them look as special as they taste.
Bringing Your Cookie Creations to Life
Decorating cookies is an art that allows you to transform simple treats into personalised, memorable delights. From intricate lace wraps to shimmering glitter sprays and rustic herbal accents, there’s no end to the creative possibilities that can elevate your cookies for any occasion. These versatile decorating techniques give you a canvas to express your style, whether it’s timeless elegance for a wedding, playful colours for a birthday, or sophisticated textures for a holiday celebration.
As you dive into these methods, don’t hesitate to experiment and put your own twist on each design. Perhaps you’ll find joy in using unique colour combinations, layering different textures, or even incorporating your favourite flavours through edible flowers or herbs. Remember, each cookie is an opportunity to make something truly special and personal.
Decorated cookies have a magical way of making any occasion feel more meaningful, adding that touch of sweetness that speaks to the heart. So, let your creativity flourish and enjoy the process—these thoughtful, beautifully decorated cookies are sure to bring a smile to anyone lucky enough to receive them.
Frequently Asked Questions About Cookie Decorating Ideas
Here’s a collection of frequently asked questions to help you master the art of cookie decorating. Whether you’re a beginner or looking to refine your skills, these answers provide valuable insights into decorating techniques, tools, and tips for creating beautifully decorated cookies.
What is the easiest way to decorate cookies?
The easiest way to decorate cookies is by using a simple icing drizzle or a dusting of powdered sugar. For a quick yet elegant look, you can dip the cookies in melted chocolate and add sprinkles or chopped nuts while the chocolate is still wet. Alternatively, use a piping bag to create easy designs with royal icing, like dots, lines, or swirls.
What do professionals use to decorate cookies?
Professionals often use tools like piping bags with fine tips, edible markers, and airbrush kits to achieve precise and intricate designs. Royal icing is a popular choice for a smooth, hard finish, while edible glitter, gold leaf, and metallic sprays add a polished look. High-quality gel food colorings are also commonly used for vibrant colours.
How far in advance can you make decorated sugar cookies?
Decorated sugar cookies can be made 1 to 2 weeks in advance if stored properly. After decorating, allow the cookies to dry completely, then store them in an airtight container at room temperature. Placing parchment paper between layers helps prevent designs from smudging. For longer storage, freeze the decorated cookies, ensuring they’re in an airtight container to preserve freshness.
Do you decorate cookies before or after baking?
Most decorations, especially icing and edible glitter, are applied after baking to avoid melting or discoloration in the oven. Some elements, like pressed herbs or certain sprinkles, can be added before baking for a rustic effect. Fondant and intricate icing designs are best applied once the cookies have cooled completely.
What are some creative ways to decorate cookies without icing?
Decorating cookies without icing is simple and fun. You can press edible flowers, herbs, or designs into the dough before baking for a rustic look. Another option is to use patterned rolling pins or cookie stamps to emboss designs directly into the dough. A light dusting of powdered sugar or cocoa powder also adds a decorative touch without icing.
Can you use regular frosting to decorate cookies?
Yes, you can use regular frosting, like buttercream, to decorate cookies. However, buttercream doesn’t harden like royal icing, so it’s best for cookies that will be eaten soon after decorating. For a firmer, long-lasting finish, royal icing is typically preferred over regular frosting.
How do you get a smooth finish on decorated cookies?
A smooth finish is best achieved with royal icing. First, outline the cookie with a slightly thicker icing, then “flood” the area inside with thinner icing. Spread it evenly with a toothpick or cookie scribe. Once the icing dries, it leaves a polished, smooth surface perfect for adding details or layering other decorations.
Can you decorate cookies with fondant?
Yes, fondant is an excellent choice for creating detailed or themed decorations. Roll out the fondant and cut it to the same shape as the cookie, then adhere it using a small amount of edible glue or light corn syrup. Fondant can be embossed, painted, or layered with other fondant shapes for a highly professional look.
How can I keep the colours from bleeding on decorated cookies?
To prevent colour bleeding, ensure each layer of icing or decoration dries fully before adding another. Using gel-based food colouring can also help, as it’s less likely to bleed than liquid colour. Avoid storing cookies in high-humidity environments, as moisture can cause colours to run.
What is the best way to package decorated cookies for gifting?
For gifting, place each decorated cookie in a cellophane bag, then tie it with a ribbon to keep it secure. For larger batches, place cookies in layers in a gift box with parchment paper in between to prevent smudging. If shipping, add a layer of bubble wrap inside the box for extra protection.
What tools are essential for cookie decorating beginners?
Beginners can start with a few basic tools: a piping bag, fine-tipped nozzles, food-safe paintbrushes, and gel food colouring. Toothpicks or cookie scribes help with smoothing icing, while stencils and cookie cutters make it easy to create various designs.
How can I make my decorated cookies look more professional?
Achieving a professional look is all about detail and finishing touches. Use a smooth base layer of royal icing, add accents like edible glitter or metallic accents, and practice using piping bags for clean lines. Take time to plan your designs, and don’t rush the drying process between layers to prevent smudging.
Previous Article
Next Article
Related Posts
- Date Ideas That Start with U: Unique and Unforgettable Dates
- Dating Quotes Cute Enough to Make Your Heart Flutter
- Butternut Squash Ravioli with Sage Butter: A Perfect Romantic Dinner for Two
- Alphabet Date Ideas: A to Z Guide for Creative Couples
- Valentine’s Day Bathroom Décor Ideas: Transform Your Space into a Romantic Haven
- Date Ideas That Start with J: Joyful and Jazzy Dates


